Begin with 5 different pieces of fabric. One of the pieces (middle polka dot) needs to coordinate with your other fabrics. This fabric will be used on both sides.
This skirt is fairly easy once you've figured out all the measurements. For that you will need to dig deep into things you filed away during high school. Specifically from your high school algebra class. You need to start with this equation. I know it looks scary, but stick with me for a minute.
Radius = Circumfrence/2*π
Begin by measuring your widest area (hips and butt) that number will be your circumference. Mine was 37 inches. So... 37/2*π (π = 3.14). I rounded the number up to 6 inches. That is the first radius measurement you'll need.We'll call it Hip Radius
Step 1 Cutting out Fabric:
Fold your fabric into fourths. (fold hotdog, then hamburger) Your folds will be on the left and on the top, Starting in the top left corner (where all the folds meet) mark your hip radius multiple times. Connect the marks so you have a quarter circle.
Next decide how long you want your first tier to be. I decided on 6 inches. I added 1 inch for seem allowances. Add your length measurement to you hip radius measurement 6 + 7 = 13 inches. Starting again in the top left corner mark your hip + length radius multiple times. Connect the marks to make a bigger quarter circle.
Cut out on the lines you just created. It will look like a donut.

Diagram of measurements.

Next you will need to cut out the fabric for your other 2 tiers. Math time again... you will need to know the measurement of the outer circumference of your skirt.
Circumference = 2 * π * Radius
So using my measurements 2*π*13 (hip + length radius) = 82" (rounded) add 6" to this number
Decided how wide you want your second and third tier to be. My second tier is 9" and the third tier is 3 inches. Add 1" for seam allowance.
Cut out your next tiers using these measurements. You may have to sew several strips together.
Tier 2- 10" x 88"
Tier 3- 4" x 88"
Step 2 Sew Tiers together:
With right sides together, pin tier 2 to the outer circumference of tier 1. This takes ALOT of pins. Click on the image to enlarge it to see just how many pins I used. Pin all the way around.
Tier one is cut on the bias which means it will stretch (that why we added 6" to the length of tier 2) When you've pinned all the was around mark where you will need to sew to combine the second tier.
Sew the second tier closed. Finish pinning to Tier 1. Sew using a 1/2" seam allowance.
Repeat step 2 to sew third tier to second tier.
Step 4 Repeat for Reverse side:
Repeat steps 1-3 with fabric for reversed side. Use the same fabric for tier 3 in both skirts.
You will now have two pieces.
Iron the seam allowances between the tiers. Iron the seam between tier 1 & 2 towards tier 2. Iron the seam between tiers 2 & 3 towards tier 3
Top stitch 1/4" in, on tiers 2 & 3.

Step 6: Combine the 2 skirts:
With skirts right sides together sew along the bottom (tier 3) with a 1/2" seam allowance. Iron seam open. Turn right side out and top stitch 1/4" from bottom all the way around.
Step 7 Create Elastic Casing:
Remember that first measurement you took (hips + butt) that is your inner circumference. Add 6 " to that. Cut a piece of fabric using the same fabric as tier 3 (or coordinating fabric) 4" x inner circumference + 6". For my measurements that was 43"
Iron 1/2" on each side. Then iron in half. This creates a sort of bias tape.
With wrong sides of skirt together place the top of tier 1 inside the waist casing you just made. Line the raw edges of the skirt up with the raw edge of the bias tape.
Pin like crazy and sew casing to skirt using a 1/4" seam allowance. Be sure to catch both sides of the casing into your sewing.
Leave about a 2" opening to insert the elastic.
Cut a piece of 1" elastic that goes around where you want the skirt to sit on your waist. Insert the elastic into the casing and sew the casing closed.
Step 8 Sew a Sash:
To create a "sassy sash" cut 2 pieces of fabric 5" x waist measurement * 3 (it will wrap around your waist 3 times). Sew with right sides together, turn and top stitch.
Tie around your skirt after you've put it on.
Step 9 TA DA:
Side 1:
My original thought was that this would be cute on a little girl, but I only have a little boy. Then I thought hey, I'm a girl! So I made it for my self. I felt kind of silly the first time I wore it, but I got tons of compliments on it, so I guess it works for big girls too.
I'll answer any questions in the comments.
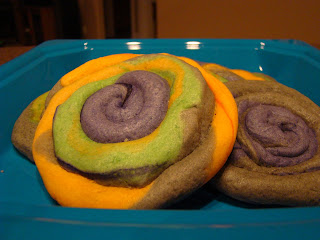
 I made these Halloween Playdough cookies and gave them as "Boos" to my neighbors. Yummy! Find the recipe here.
 I made these Halloween Playdough cookies and gave them as "Boos" to my neighbors. Yummy! Find the recipe here.


